A Forager's Home

Grow. Find. Eat. Make.

  • Blog
  • About
  • DIY
  • Recipes
  • Foraging

Product Spotlight: Handwoven Area Rugs

May 21, 2018 by Kelsey Fast in Make

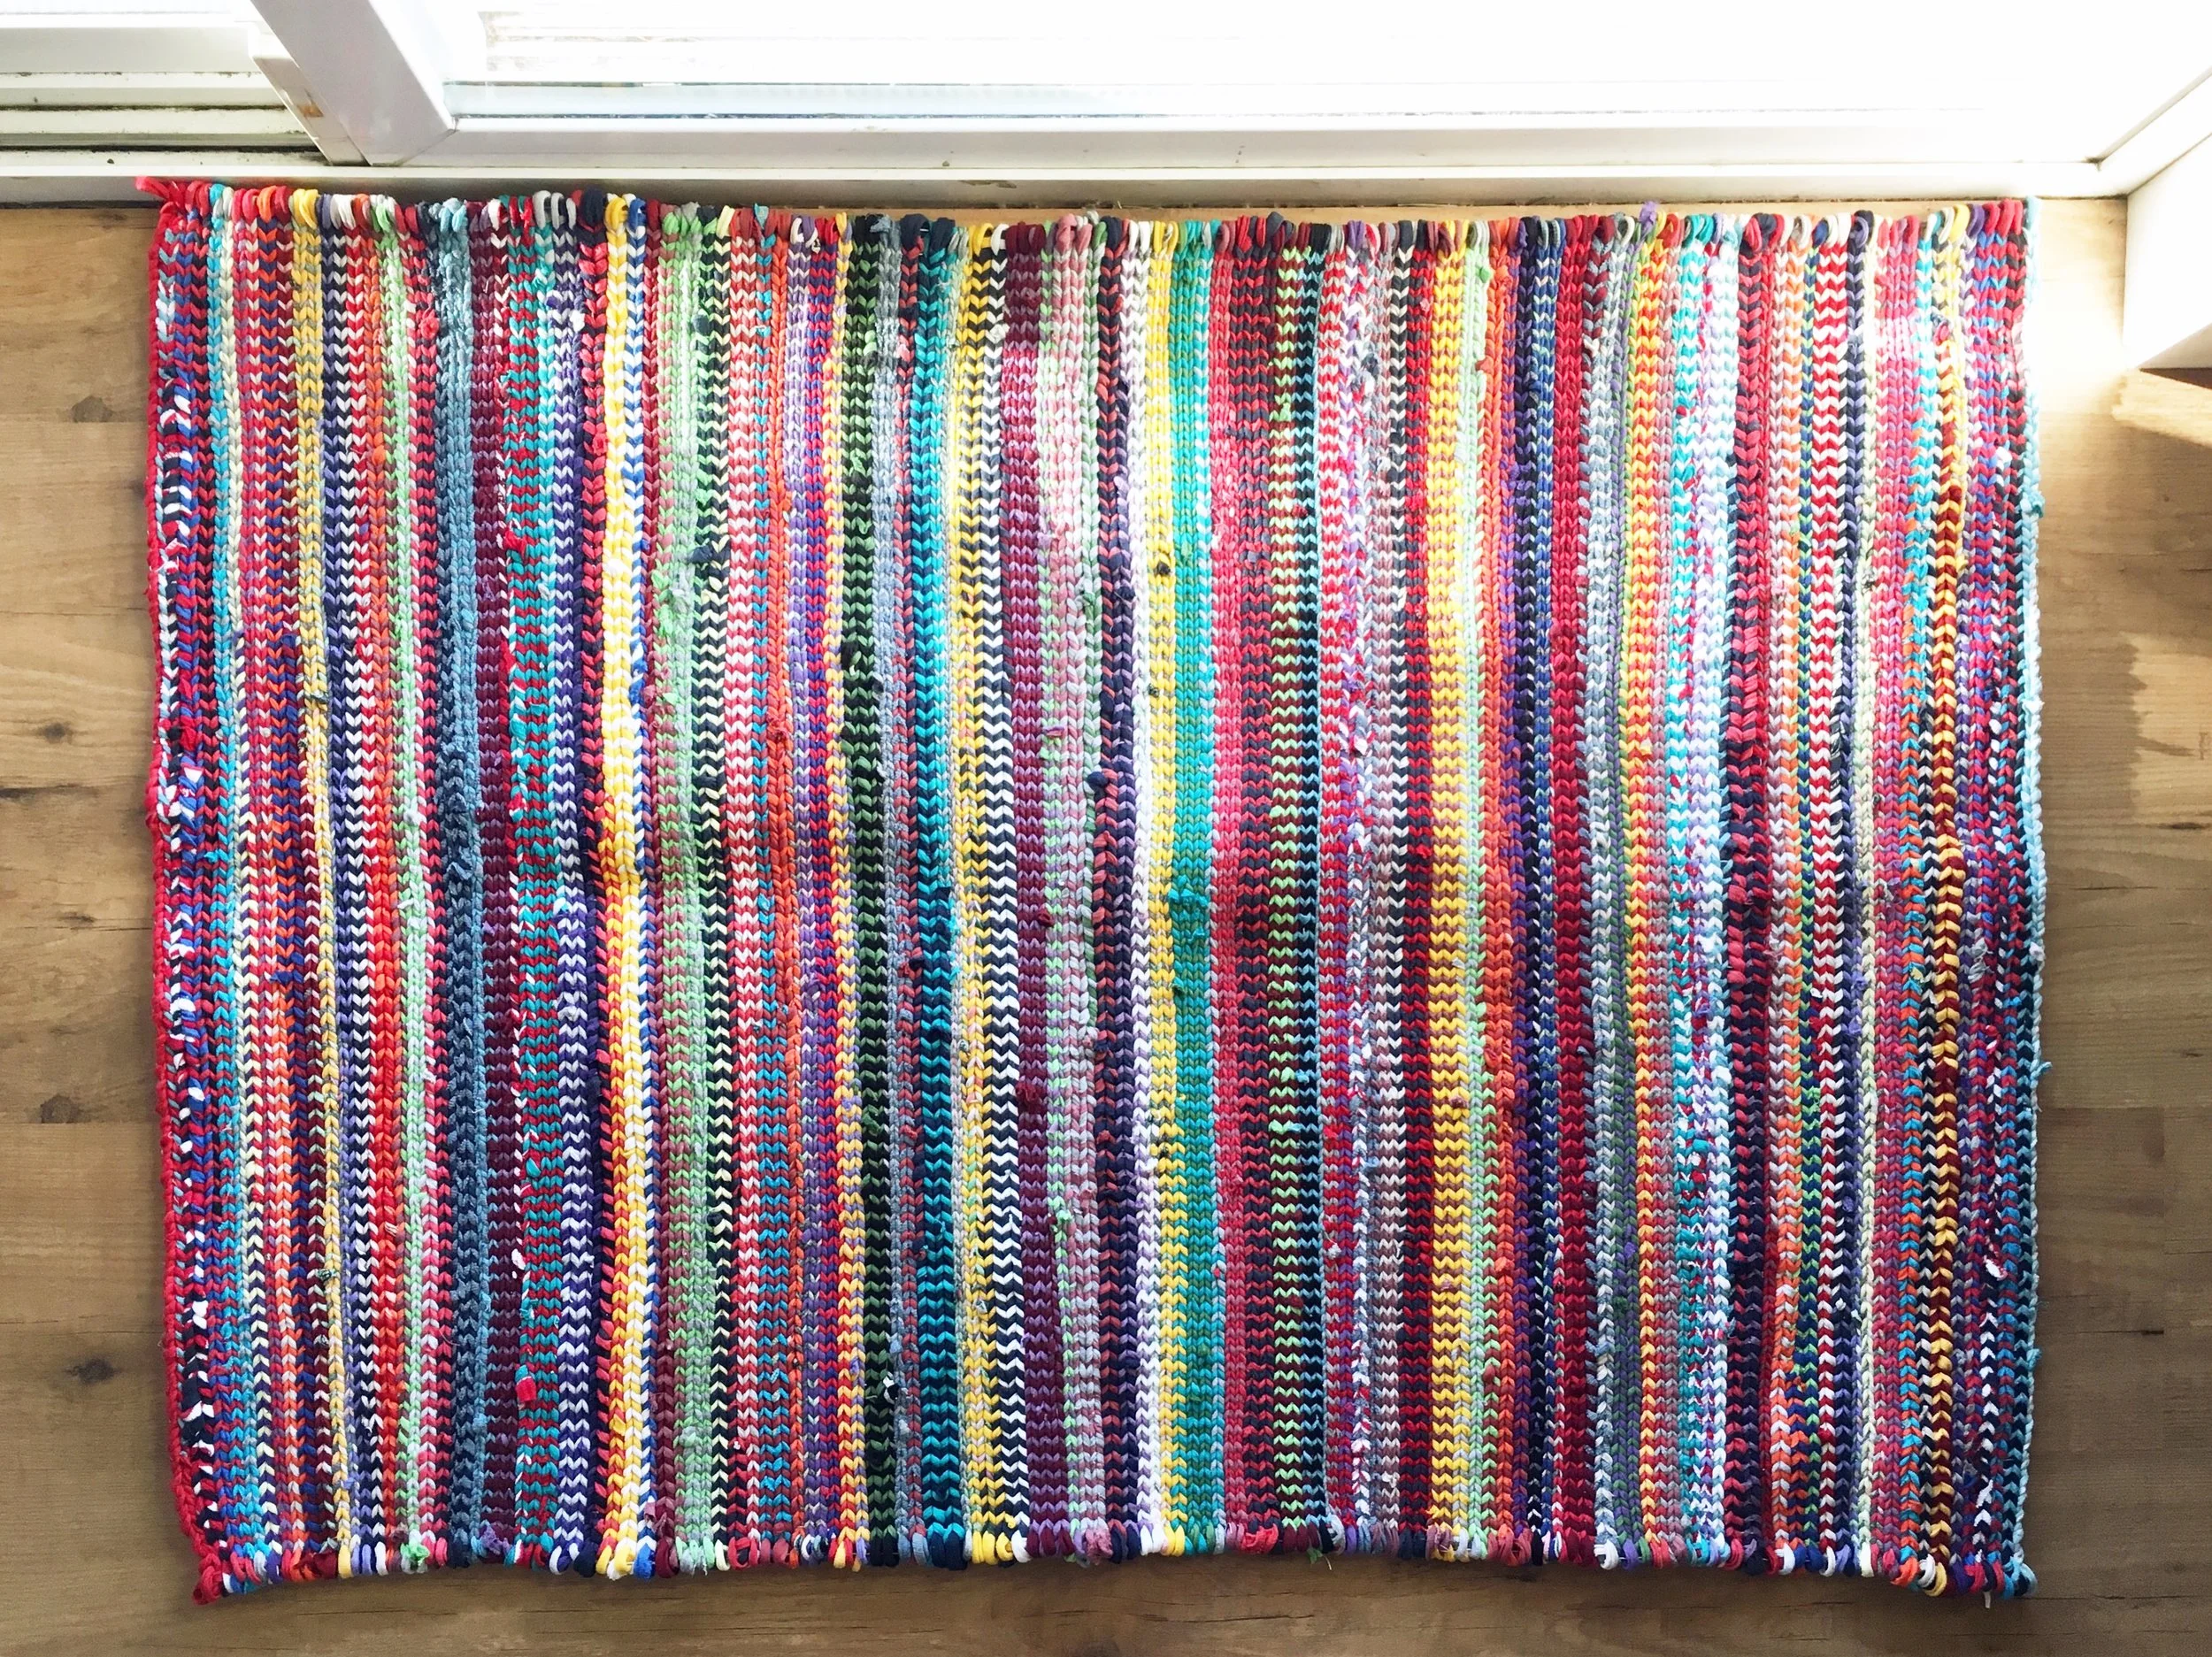
I am so happy to share my most recent addition to my shop - handwoven area rugs!  These are the perfect size if you want something unique to greet guests as they enter your home, or to brighten up your kitchen.  These are made from recycled fibres from fabric that would have otherwise been thrown in the garbage, and are completely machine washable (lay flat to dry).  

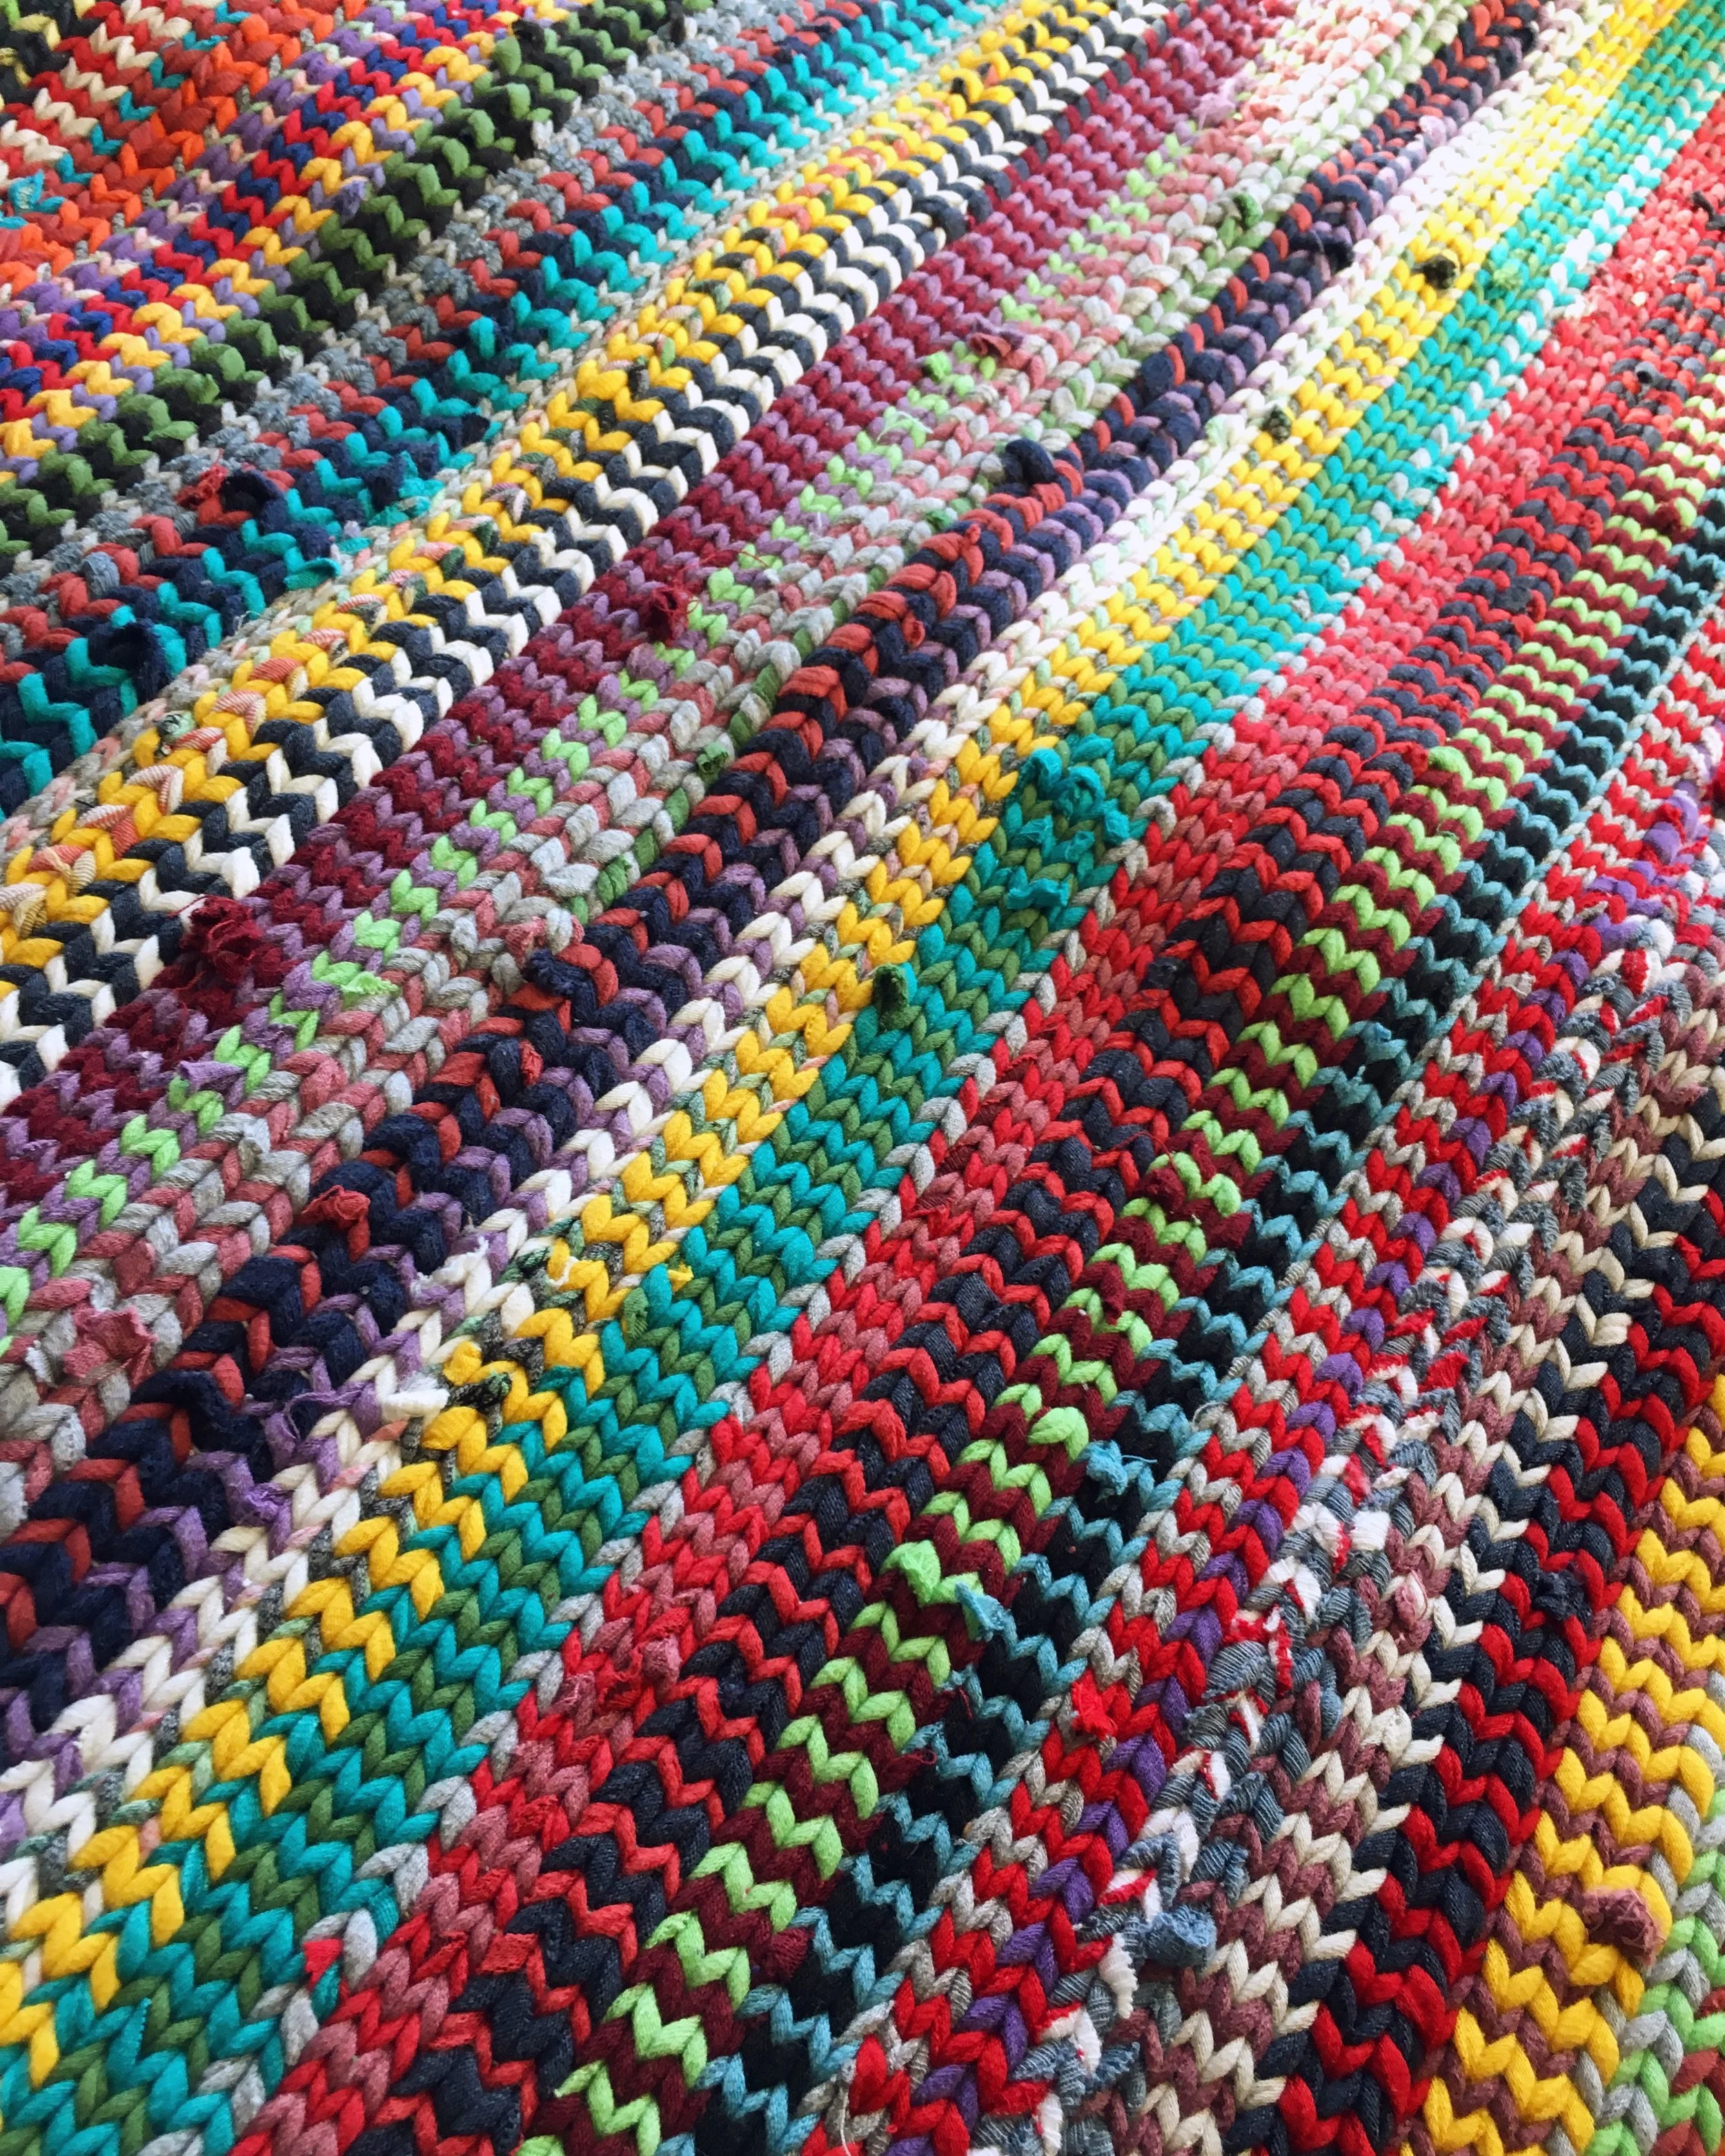
It is so lovely to have something beautiful come from garbage.  this rug in the photos here was mostly made from t-shirts.  My grandmother helps run a used clothing service at her church, and they are often given things that no one would want to wear again.  Previously they would just toss them, but now I have a steady supply of perfectly usable fabric to make these rugs and nothing is wasted.

Shoes from Brave Soles.

Shoes from Brave Soles.

I plan to make these rugs in different sizes in the future, so if you have an idea for something you'd like that isn't exactly this contact me and we'll see if your dream can become a reality.  


To support my blogging endeavours, this post contains affiliate links from which I receive a small commission if you make a purchase.  Every product linked here is one I have used personally and would recommend based on my experience.

May 21, 2018 /Kelsey Fast
a forager's home shop, home decor, upcycle, zero waste, area rug, weaving, handmade
Make
Comment
IMG_9189.JPG

Dandelion Egg Noodles

May 18, 2018 by Kelsey Fast in Find, Eat

I feel I have to preface this recipe by stating that I am by no means a pasta expert.  There are no Italians in my family, so I'm basically just making it up as I google along.  This method has been working pretty well for me so far, so I thought I'd share it.  A few things that have helped my amateur self have been my Kitchen Aid stand mixer, Vitamix blender, and marble rolling pin (this last one is because I don't have a pasta machine - although I do have my eye on this - and the heaviness of the marble pin helps get the dough thin enough)

IMG_9190.JPG

I've written about making dandelion greens into pesto to use in a pasta sauce before, but this time I added the puree right into the dough for the noodles.  This uses way more leaves than you'd eat in the average salad, so it's a great way of packing more vegetable content into a meal that is pretty carb-focused.  


Dandelion Egg Noodles

Ingredients

  • 4 cups dandelion greens
  • 2 large eggs
  • 3-4 cups flour

Takes 20 min, serves 4-6.

Instructions

  1. Using a high powered blender or food processor blend dandelion greens into a fine puree. Add a small amount of water if needed to get things moving.
  2. Put three cups of flour in the bowl of a stand mixer (or on a flat tabletop if you want to knead them the traditional way). Make a well in the middle, and add eggs and dandelion puree. Knead until smooth and homogenous. Add more flour if the dough is still too sticky to roll out.
  3. Sprinkle flour over a large countertop and roll out to a thinness where you could see your fingers through the dough (this will be thinner than the ones in my photo). Use more flour if necessary to keep it from sticking, but you don't want to add too much and make them too dry.
  4. Using a very light dusting of flour to keep things from sticking, fold the dough over top itself a few times, and cut with a sharp knife into noodles.
  5. Boil for a few minutes in very salty water, and finish in whatever sauce you prefer.

To support my blogging endeavours, this post contains affiliate links from which I receive a small commission if you make a purchase.  Every product linked here is one I have used personally and would recommend based on my experience.

May 18, 2018 /Kelsey Fast
dandelions, pasta, recipe, in my kitchen, foraging, food
Find, Eat
Comment
IMG_9192.JPG

Wild Lettuce Soup

May 07, 2018 by Kelsey Fast in Find, Eat

Wild lettuce is something I've been foraging this year that's new to me.  I noticed a whole bunch of it popping up last year, but only recognized what it was when it was about three feet tall, flowering, and too bitter to imagine eating.  This spring when the snow finally melted, I noticed several of these little rosettes, and it occurred to me that the leaves looked almost like skinny lettuce.  I threw a few photos up on one of the amazingly helpful Plant Identification groups on Facebook, and did a bit of googling, and realized that their resemblance to lettuce was because they were!  The following hints about how to identify wild lettuce are not comprehensive enough to guarantee what you've found.  Before eating any wild plant please do your research and make sure you know what you are eating.  There's no good reason to risk eating something that you are not 100% sure of.

IMG_9097.JPG
IMG_9191.JPG

This wild member of the lactuca family is the ancestor of the lettuce you see in the grocery store. You want to make sure you harvest it young, because otherwise it becomes too bitter.  Look for lush leaves coming up in a rosette, with somewhat wavy and possibly even slightly prickly edges. The midrib of each leaf should have some prickles forming on the back.  One of the most telltale signs is a milky sap when you break off a leaf.

Milky sap is usually an indicator that the plant is something you shouldn't be eating, but notable exceptions include wild lettuce, and also the dandelion.  These bitter spring greens are the perfect thing to eat after a winter of rich and heavy food.  I think that is one of the beautiful things about seasonal eating.  

Wild lettuce is, in fact, very bitter.  It goes even beyond most kales I've eaten, and some people will have a very hard time eating it.  While you could include it in your spring salad mix, I find it more palatable cooked.  The soup below was a really nice way to eat these greens, and the bitterness balanced out the richness of the other ingredients beautifully.  If you still find them too bitter try leaving it to eat until the next day.  When I ate the leftovers I found the flavour had completely mellowed and was even more delicious.

IMG_9193.JPG

Wild Lettuce and Bacon Soup

If you still like the look of this recipe but can't find any wild lettuce, swap it out for kale or another strong and bitter green that you have on hand.

  • One large onion
  • Two cloves garlic
  • 5 - 6 slices bacon
  • 4 - 5 Yukon gold potatoes
  • 2 - 3 cups wild lettuce
  • 2 tbsp butter
  • 2 cups milk
  • Rosemary
  • Basil
  • Paprika
  • Red Pepper Flakes
  • Salt
  • 1 tbsp lemon Juice
  1. Melt the butter in the bottom of your pot, and as it heats mince the onion.  Sauté until translucent.  Mince the garlic and add.
  2. Add the bacon and cook until crispy.  
  3. While the bacon is cooking, chop the potatoes into small, bite sized pieces.  Add them into the pot and sauté briefly.
  4. Cover everything with water and simmer until the potatoes are cooked.
  5. Pour in milk, and add spices in the amounts that you like.  Bring back to temperature, and chop the wild lettuce.  Throw it in and put the lid on for a few minutes.  Once the greens are steamed slightly stir them in.  
  6. When the lettuce is just wilted add the lemon juice and taste to see if you need to adjust your spices.  When you are happy with everything it is ready to enjoy!
May 07, 2018 /Kelsey Fast
soup, wild lettuce, foraging, in my kitchen, recipe, spring, food, harvest
Find, Eat
3 Comments

Meals From the Pantry: Strawberry Lemon Frozen Yogurt with Chamomile

May 04, 2018 by Kelsey Fast in Eat

I am getting to the point where the garden is coming to life, and I am harvesting quite a few wild plants so the recipes here are going to start to focus on more seasonal ingredients, but I wanted to post one more recipe to my Meals from the Pantry series before fully switching gears.  While Frozen yogurt might not strike you as a "use up what you already have" type of recipe, the key ingredient here is jam or preserves, and I have quite a bit of that from the past canning season to use up!

I love making jam.

There's just something about commingling the different flavours that I really enjoy.  I like to add unexpected herbs, or combine flavours you might not have thought of.  Marisa McLellan's Food In Jars was my gateway to creative preserving, while still keeping all the guidelines for safe food preservation in the forefront.  If you are going to do something like this, it is very important hat you make sure you follow the protocols to keep whoever is eating your preserves safe from botulism and other issues.  One problem with my love of making jam is that I have now made so much more than I or my family can ever eat!  I have given some away, but I am still left with quite a backlog, so I've been trying to think of different ways to use it all up.  One day it struck me: frozen yogurt!

IMG_9183.JPG
IMG_9185.JPG
IMG_9184.JPG

I used an ice cream maker, because I have one that I love, but there are methods out there for freezing ice cream without one.  I think you can put your mixture in a container and remember to stir it up every hour or so until you like the consistency.  I'll link to the ice cream maker I use if you're in the market for one.

While full fat yogurt, and heavy cream might require you to make an extra purchase, they are staples in my fridge.  When making frozen yogurt or ice cream, it is important to get enough fat into the mixture, so because yogurt usually doesn't contain that much fat, it is important to add a bit more so that when your mixture freezes you don't get an unpleasant mouthfeel.  The same is true with sugar.  This recipe doesn't have any extra sugar, because we are using very sugary jam.  A lot of people think of frozen yogurt as something healthy, but it really isn't.  That doesn't mean you shouldn't indulge, but I'm not going to pretend like it's any healthier than a bowl of ice cream.  Indulge in moderation (or not - I have zero moderation when it comes to ice cream).  As always, if you try one of these recipes let me know!  I'd love to see your posts on social media tagged #aforagerspantry, or drop a link in the comments!


Print Friendly and PDF

Strawberry Lemon Frozen Yogurt with Chamomile

Ingredients

  • One 500ml container of lemon yogurt with as high a fat percentage as you can find.
  • 1/2 cup heavy cream
  • 2 cups strawberry chamomile jam or preserves

Takes 30 minutes, serves 4.

Instructions

  1. Whisk all the ingredients together in a bowl trying to incorporate as little air as you can.
  2. Freeze mixture according to your ice cream maker's instructions, or using whatever method you prefer.
  3. Scoop out of the bowl of your ice cream maker, and freeze in a container for a couple hours if you want it to be harder than soft-serve consistency. I like using a bread pan for this purpose because of the shape, but I'm looking for something that has a lid without being plastic.

To support my blogging endeavours, this post contains affiliate links from which I receive a small commission if you make a purchase.  Every product linked here is one I have used personally and would recommend based on my experience.

May 04, 2018 /Kelsey Fast
kitchen, jam, berries, frozen yogurt, preserves, meals from the pantry, strawberries, recipe, food
Eat
2 Comments

Growing Pea Shoots and a Couple Ways to Eat Them

May 02, 2018 by Kelsey Fast in Grow, Eat

They are rising in popularity these days - and have long been popular with some cultures outside North America - but pea shoots still aren't something you find on your average grocery store shelf.  I've snipped a few here and there from the peas I've grown, but this year I tried growing them in flats kind of like you would with micro greens and I'm not sure why I didn't start doing this earlier!  

Growing pea shoots this way you have all the deliciousness of fresh peas without waiting until the pods are ready to harvest.  I can't believe I didn't start doing this earlier!  

The variety I used (linked above) is an heirloom pea that actually has beautiful red flowers if you let it grow longer.  It is known for its' strong, succulent tendrils which is why it is a great candidate for growing in this way. All you need to do is fill a flat tray like the seed starting tray in the photo below (linked above) almost to the top with a good quality potting soil suitable for growing vegetables (I used promix and I've linked it above as well although I will say I've seen it cheaper elsewhere).  Scatter the pea seeds on top.  You can crowd them in pretty closely because you're going to cut them when they are only a few inches high so you don't have to really worry about them competing for nutrients.  Cover them with a bit more soil, and then water thoroughly, but not to the point of creating a swamp.  

After you've got them planted the upkeep is really simple.  Just make sure to keep it moist without letting it get waterlogged.  You really won't need to water much as there is no drainage, but you do need to keep the seeds moist so that they actually sprout.  Once they are around six inches tall you can harvest them at any time, but don't let them get too much longer or they will be a bit tough.  Use these as you would use any other spring green - in salads, as part of a sandwich filling, in a frittata - you name it!  Here are a few things that I've been making recently to give you a few ideas.


Print Friendly and PDF

Pea Shoot Green Sauce

Ingredients

  • Pea Shoots
  • Green Garlic, or 1 Garlic Clove
  • Lemon Juice
  • Salt
  • Olive Oil

Takes 15 min, serves 6.

Instructions

  1. Put pea shoots, green garlic, juice of half a lemon (go easy here as it can be overpowering and you'll have a chance to add more later), teaspoon of salt (again, you'll have the chance to add more later if you need to), and enough olive oil to make it liquid enough to blend in a blender or food processor. Pea shoots are soft enough that a mortar and pestle would work as well, but it would take longer.
  2. Blend until you like the consistency. I keep mine chunkier because I like to spread it on toast (adding a fried egg on top is an incredible idea as well).
  3. Taste and add more salt, lemon juice, or olive oil until you like the taste and texture. Spread it on toast, use it as a dip, or put it on a burger - the options are endless!

Print Friendly and PDF

Ginger Miso Sautéed Pea Shoots

Ingredients

  • Large Bunch of Pea Shoots (overesimate as they shrink down quite a bit with cooking)
  • Small thumb of Ginger, minced
  • 1 tsp Miso Paste
  • Butter or Olive Oil for Sautéing

Takes 15 min, serves 2-4 Depending on the amount of pea shoots. Estimate 1 large handful per person..

Instructions

  1. Heat the butter or oil in a frying pan on medium-low heat.
  2. Whisk the ginger and miso into the butter until it blends into a sauce.
  3. Arange sliced mozzarella and tomato on flatbread. Place back in oven until cheese is melted and bubbly.
  4. Add the pea shoots and sauté until wilted, but not mushy.

To support my blogging endeavours, this post contains affiliate links from which I receive a small commission if you make a purchase.  Every product linked here is one I have used personally and would recommend based on my experience.

May 02, 2018 /Kelsey Fast
recipe, food, in my kitchen, pea shoots, garden, harvest, spring
Grow, Eat
Comment
  • Newer
  • Older

Terms and Conditions | Privacy Policy | Shipping and Returns

Powered by Squarespace