A Forager's Home

Grow. Find. Eat. Make.

  • Blog
  • About
  • DIY
  • Recipes
  • Foraging
gardenmay2016.jpg

Grow Write Guild No. 3 - Describe Your Garden Right Now

May 22, 2016 by Kelsey Fast in Grow

I realize it has been quite a while since my last Grow Write Guild post (and that the Grow Write Guild is so old that probably no one is doing it anymore).  Probably about a year.  Despite my neglect, I think the writing prompts are really helpful and interesting.  Usually I just do a quick update that is mostly photos, and maybe a recipe tagged on at the end.  Most of these prompts are not something I would normally think to spend time writing about, and so that is why I still want to continue with them.

Despite what I just said, I wish that I read this prompt before I wrote my last post since it is basically about the same thing!

"Describe your garden right now".

Well right at this current moment it is covered in rain, which as a gardener and as someone living in an area at risk for wildfires I have to say I am ok with that.  My perspective on rain has changed dramatically since moving from coastal BC to the southern interior of the province.  Rain used to be the backdrop of nearly every day from November to June!  Now a rainy day is a rare reprieve from the heat.  I am adjusting to this new climate, but I still make a lot of mistakes.  Not to mention that each season is so different from the last that I feel like I'll never quite get it right!  Last year summer came on with the flip of a switch in April if you can believe it.  This year we are having much more of a normal spring with rain and cooler days.  Last year I couldn't grow peas or radishes to save my life.  The heat came on so heavy the peas stayed half a foot tall, and the radishes bolted up to flower almost as soon as I put the seeds in the ground!  This year both are flourishing.

Speaking of peas and radishes, these are both unlikely success stories when it comes to my seed saving efforts.  Unlikely for the radishes since I have always had to garden in very small spaces and often try to grow different varieties of the same type of plant.  Preventing cross-pollination is a huge challenge in such close quarters.  Last year since they all bolted I wasn't able to get any of the roots, so I decided to see what would happen if I let them go to seed.  They might not be quite true to form (which is a pity since they are a beautiful heirloom variety called Purple Selzer from the preservation gardens collection of Seed Savers Exchange that looks like it is not available any longer) but they are still producing.  I am hoping I can weed out the ones with the wrong characteristics and get them back on track.  I was also growing some Rat Tailed Radishes - also from Seed Savers Exchange - and I was hoping since they had slightly different blooming times that the seeds would not cross-pollinate too much.  We'll see what happens.  So far I'm just impressed that the seeds were viable at all!  I wasn't convinced that it would work out.

The peas star in a story of my forgetfulness.  I was really excited to save some of the seeds from the Amish Snap peas I planted a few years back in my garden in Surrey.  I let the plants go brown and harvested the seeds at exactly the right time.  After that I promptly forgot them outside in the garden only to remember to go get them after the pouring rain had soaked them through.  I was hoping that I could somehow dry them out and that not too many would germinate right away.  Maybe I could save them!  I figured it couldn't hurt to try them out if I happened to have a spare garden bed sometime in the cooler weather.  Lo and behold that opportunity came earlier this year in March.  I hadn't purchased any seeds yet for this year so I thought I might as well find out what the verdict was.  It had been quite a while and there was no sign of growth so I picked up a few more pea varieties to try, but when I went to put them in  there were quite a few pea seedlings poking out from the ground.  Rather than waste the other seeds (although I suppose I could have tried returning them) I sowed them too and now - as I referenced in an earlier post - I am accidentally growing three varieties of peas.  It remains to be seen if this was a bad idea or not.  So far all are growing well and two are already blooming!  I must make sure to save the Amish Snap seeds again this year!

As for the rest of my garden there is garlic (Russian, German, Music, and also a variety I do not know the name of that I have been growing for four years), buckwheat (sharing a bed with the Green Arrow peas), beets, onions, scallions, spinach, rat tailed radishes, raspberries, haskaps, potatoes, and many herbs.  I am really happy with everything so far, but I am starting to feel the crunch of the warmer weather and I need to get my summer crops going!  I don't want to be caught without any tomatoes, peppers, melons, corn, or squash!  I may not succeed with those things (I have had mixed results so far), but it is always my goal to try.

growwriteguild_banner600.png
May 22, 2016 /Kelsey Fast
Grow Write Guild, Garden
Grow
Comment
onemonthgardenprogress2016.jpg

One Month of Garden Progress

May 21, 2016 by Kelsey Fast in Grow

I can hardly believe the amount of growth that has happened in just one month!  The two photos aren't exactly lined up - the potato bin is much more visible in the left photo than the right for example - but it does show the difference well.  

This has been a good spring for the growth of the peas (of which I accidentally planted three varieties and that was a bit of an oops in my small garden).  Last year it turned hot so fast anything meant to grow in cooler weather got stunted or immediately bolted to seed!  I hope that some of them finish up their growth before I have to move some things around for more of the summer crops.  It is already the May Long Weekend and I'm feeling more than a bit behind when it comes to things like tomatoes, squash, melons, and peppers!  Well we'll see what happens.  

Every year I garden is such a learning experience.  I have been horrible at timing my tomatoes every year so far and this year is no exception.  So far they are growing, but they are very tiny compared to the starts in garden centres.  I'm probably a month behind.  I hope they catch up!  If not I am happy that Laughing Swan Farms come to the market every week with their beautiful tomatoes so that at least if I can't eat my own I can still get my hands on some gorgeous heirlooms.

peas2016.jpg

I am also excited to see that the raspberries I have in containers are blooming like crazy!  How exciting for Mr. Forager since raspberries are his favourite!  I don't particularly like them but maybe I will enjoy raspberries that I grew myself.

Here are some good shots below of the potato bin we are working with this year.

potatobin2016.jpg
May 21, 2016 /Kelsey Fast
garden
Grow
1 Comment
haskapbushes2016.jpg

When to Harvest Haskap Berries (hint: not now!)

May 15, 2016 by Kelsey Fast in Grow

I purchased these little haskap bushes last year at the Farmers' Market after reading information that suggested they would fit both my climate and my renter's garden (read: easily dismantled raised beds and containers) and I thought I would give them a try.  They are a type of edible honeysuckle also known as 'honeyberries' and are good to go all the way down to zone 3!  The jury is out as to whether they are native to Canada or not.  Some sources suggest yes, others that they have naturalized here from other locations.  For me all of those factors were enough to pique my interest so I picked up the two plants necessary to ensure good cross pollination.

After almost killing them last summer by underwatering they survived the winter and bounced back admirably.  They sent up new shoots, blossomed, fruited, and today they surprised me with a few dark blue berries.  I thought it seemed early, but most berries are ripe when they are the correct colour, so I picked them.  After that however I learned that the case with haskaps is a bit different and that you have to check the taste to determine ripeness.

haskapberries2016.jpg

Nice dark blue berries - must be ready, right?  Oh boy were they sour!  Oh well - four berries is hardly enough to seem like a waste although they did not make very many berries this year. There are a couple more that I will try later on in the summer!

May 15, 2016 /Kelsey Fast
haskap, garden, berries
Grow
Comment
dandelionpesto2016.jpg

Dandelion and Friends Pesto

April 06, 2016 by Kelsey Fast in Grow, Eat

Ok everyone, to me this is the weirdest time of year.  The weather is warm, the sun is shining, and things are starting to grow in the garden, but there is nothing ready to harvest yet!  Just look at those tiny garlic sprouts!  Sure I have some herbs, but a few chives and a sprig of mint hardly feel like an actual harvest of anything.  

garlic2016.jpg

HOWEVER

Don't forget the humble dandelion and his friends known collectively as false dandelions!  In my area none of them are flowering yet so this is the perfect time to eat the leaves as they are not too bitter yet.  If you've never been out foraging dandelions are the perfect thing to start with since they have no poisonous lookalikes.  If it looks like a dandelion you're good to go!  When you get home with your bounty of beautiful green leaves soak them in a combo of water and vinegar just in case a wandering animal used them as a toilet.  After that rinse them with plain water and they'll be ready to eat!  If you're still leery you can sometimes find dandelion greens in the grocery store, but why pay for something you can get for free for almost no effort!

Ok so you have your dandelion greens.  Now what?

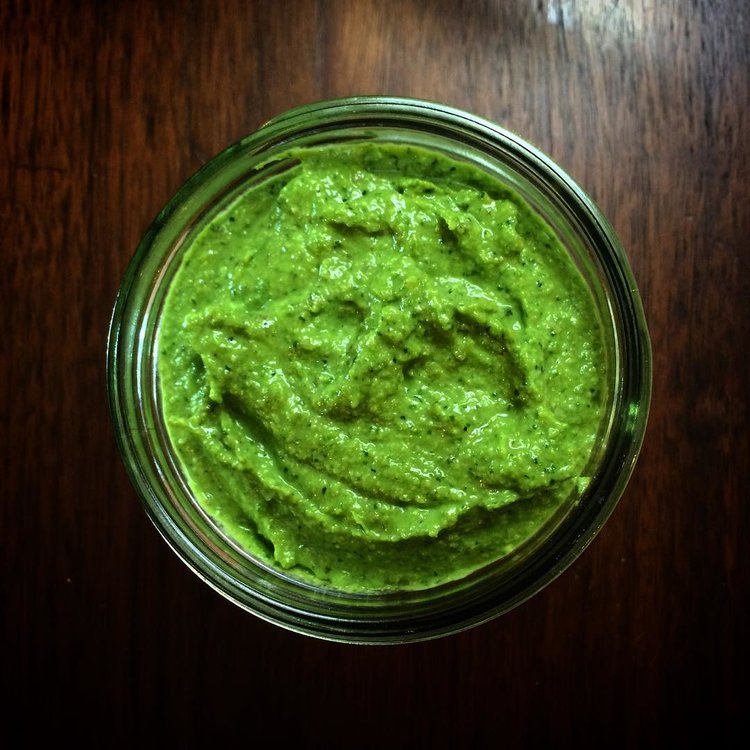
Use them like any other green in your kitchen!  Make a salad!  Wilt them in with your scrambled eggs!  Purée them in a green smoothie or a soup!  Since in my family we love condiments I made pesto.

Isn't that a beautiful green?  In case you were wondering #nofilter.  In my recipe I guessed a bit on the amounts so scale them up or down a bit depending on how much of the greens you gathered.


Print Friendly and PDF

Dandelion Leaf Pesto

Ingredients

  • 3-4 cups Dandelion Leaves
  • 1/2 cup Pine Nuts or Walnuts
  • 1/4 cup Olive Oil plus more to add at the end to get the consistency right
  • 2 Garlic Cloves
  • 1/4 Cup Parmesan Cheese
  • Juice of One Lemon

Takes 15 min, serves 6.

Instructions

  1. Gather and wash your dandelion leaves. If you are worried about the cleanliness of your foraged leaves add a little vinegar to your water and soak them for a couple minutes in that solution.
  2. Toast the nuts in a pan on medium heat just until you can start to smell them. Do not multitask at this part because they will burn quickly.
  3. Put ingredients - liquid first - in a high powered blender or food processor, and blend until the mixture reaches a paste-like consisency. Add more oil as needed until it reaches your desired thickness.
April 06, 2016 /Kelsey Fast
recipe, pesto, condiments, kitchen, garden, spring
Grow, Eat
2 Comments
troutdinner2016.jpg

First Harvest of the Season

April 02, 2016 by Kelsey Fast in Eat, Grow, Find

Ok, that makes things sound a lot better than they are, but I had chives growing that I thought I had killed, so that's a reason to celebrate, right?  Those chives are about the only thing I have growing that is ready to use, but going out and picking anything from the garden feels really good right about now!  I threw them in with the potatoes and they were delicious!

The other thing that is awesome about this dinner is that we had some trout that Mr. Forager brought home last August left in the freezer.  We're out of fish just in time for fishing season to begin again soon.


HOW TO MAKE THIS

Trout: Put prepared fish (gutted and cleaned etc) in a baking dish.  Stuff cavity with lemons and seasoning of choice.  This time we used Bow River Fish Blend from Silk Road Spice Merchants in Calgary, AB.  Bake at 350 degrees until nice and flaky.  We forgot to add a few pats of butter, but you shouldn't!  

Potatoes: These were kind of big so I cut them in largish chunks and boiled them.  When tender drain water and add butter and finely chopped chives.  Salt to taste.

Green beans: Sauté garlic in butter.  In a few minutes add the beans.  Sauté until done (find this out by tasting a bean - I like mine still crunchy so I don't cook them for very long).

Enjoy!

April 02, 2016 /Kelsey Fast
fishing, recipe, kitchen, garden
Eat, Grow, Find
Comment
  • Newer
  • Older

Terms and Conditions | Privacy Policy | Shipping and Returns

Powered by Squarespace